
The Best 7 Layer Dip {Easy Recipe}

A classic, crowd-pleasing seven-layer dip assembled in minutes with layered refried beans, guacamole, seasoned sour cream, salsa, cheese, lettuce, olives, tomatoes, and green onions — perfect for parties and game day.
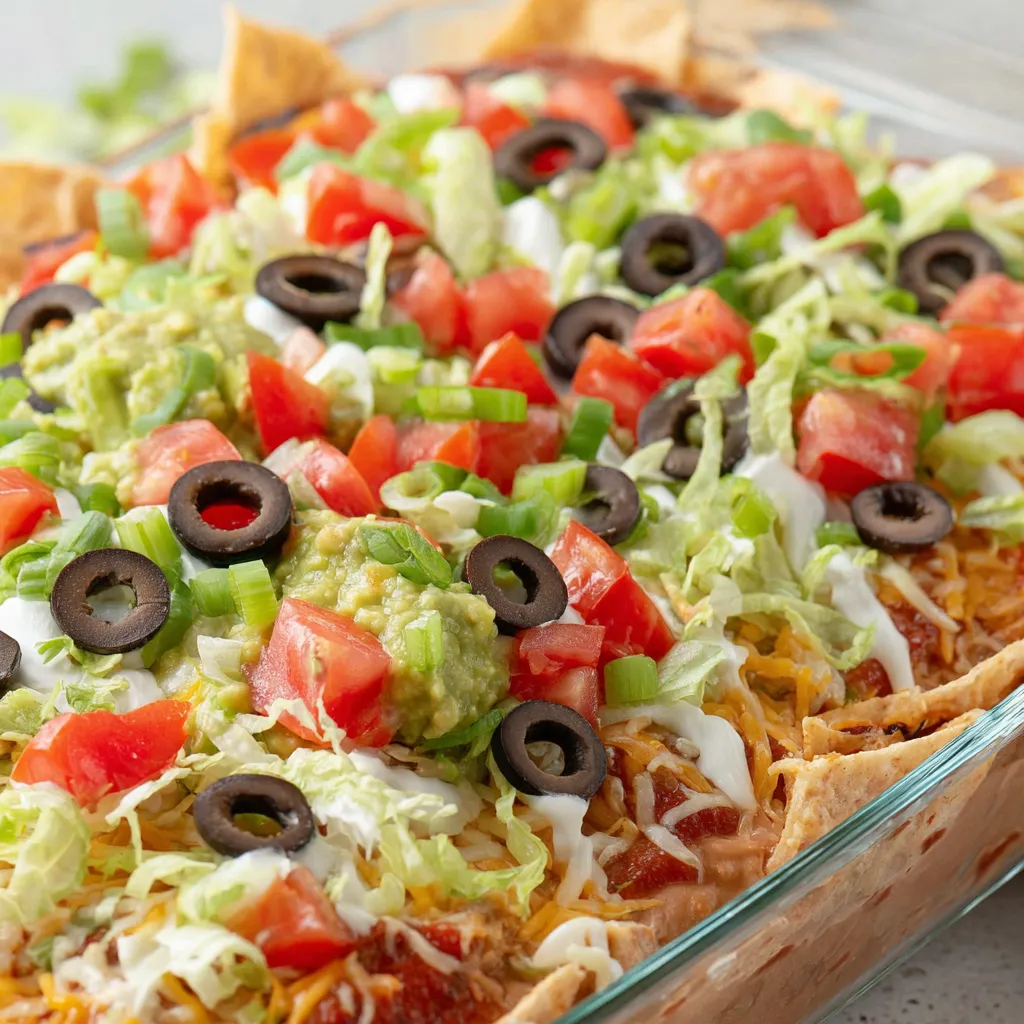
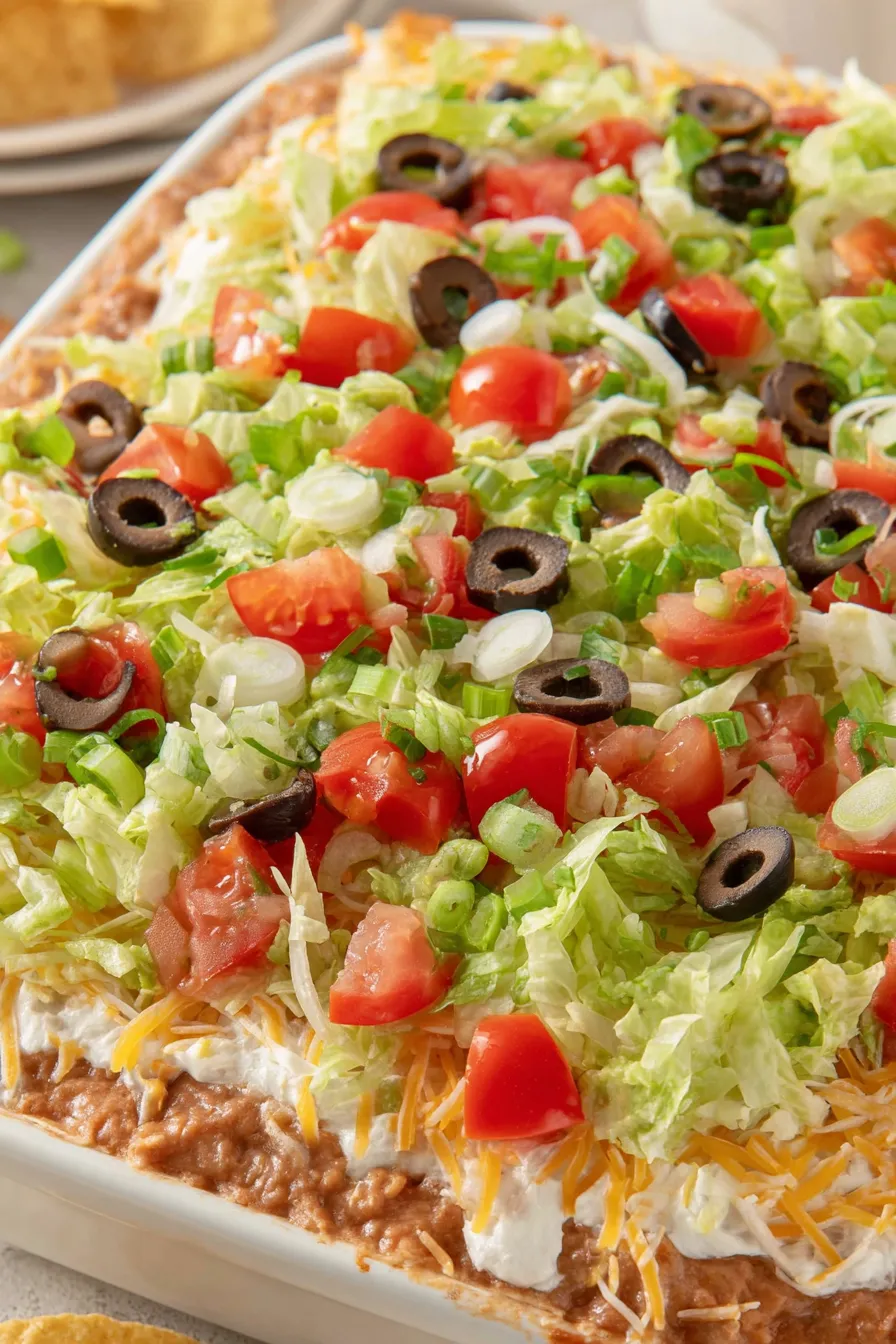
This seven-layer dip has been my go-to for every casual get-together and holiday gathering for as long as I can remember. I first perfected this version during a busy tailgate season when I needed something that traveled well, held up under heat lamps, and still tasted fresh straight from the cooler. The layers build texture and flavor: a warm, creamy base of refried beans, a cool blanket of guacamole, tangy seasoned sour cream, bright tomato-forward salsa, melty cheese, crisp lettuce, briny olives, bright tomatoes, and a sharp finish of green onions. It feels nostalgic and festive at the same time.
What makes this particular preparation special is the balance and the practical shortcuts. Using premade guacamole and pre-shredded cheese saves time without sacrificing taste; draining the salsa keeps the layers from getting watery; and a touch of water thins the canned refried beans so they spread smoothly into the pan. Family members always reach for seconds, and I still remember the time my picky nephew asked for a spoon and declared it his new favorite — that’s how this dish became a staple at every summer barbecue in our circle.
Why You'll Love This Recipe
- Ready in about 20 minutes using mostly pantry items and a few store-bought components like premade guacamole and pre-shredded cheese, which makes it ideal for last-minute entertaining.
- Layered textures and balanced flavors — creamy beans and guacamole, tangy sour cream with taco seasoning, bright salsa, and crunchy lettuce — so every bite is different and satisfying.
- Scales easily: double or halve the amounts to fit the size of your gathering; it travels well for potlucks and holds up in a cooler for hours.
- Make-ahead friendly: assemble up to 6 hours in advance and chill; it stays fresh and keeps the layers distinct if you drain watery items like salsa and tomatoes.
- Accessible ingredients: most items are common grocery staples and I include brand suggestions to make shopping quicker and more predictable.
Personally, I love how this recipe bridges convenience and homemade flavor. The first time I made it for a neighborhood block party, my friend complimented the texture contrast and asked for the recipe immediately. Since then, I tweak it slightly depending on the occasion — more jalapeños for spice or swapping lettuce for shredded cabbage for extra crunch — but the core assembly technique remains the same and never fails to impress.
Ingredients
- Refried beans: 32 ounces (two 16-ounce cans). I use Old El Paso brand when I want a familiar, smooth texture; thinning the beans with a few tablespoons of water makes them easy to spread and keeps them from clumping in the pan.
- Water: 3 tablespoons. This small amount is used to loosen the refried beans so you can spread an even base layer; add a little more if your beans are particularly stiff.
- Guacamole: 1 1/2 cups premade mild guacamole. I used Walmart Freshness Guaranteed — choose a guacamole with bright avocado flavor and minimal citrus to avoid making the layers tangy.
- Sour cream: 2 cups. Full-fat sour cream gives the best texture and mouthfeel for the seasoned sour cream layer; low-fat works in a pinch but will be tangier.
- Taco seasoning: 1 ounce packet mild taco seasoning (store brand Great Value is convenient). Mix it into the sour cream to add the classic Tex-Mex spice without overpowering the other layers.
- Salsa: 16 ounces chunky mild salsa (Pace recommended), drained through a mesh strainer to remove excess liquid and avoid sogginess in the dish.
- Lettuce: 2 cups shredded lettuce for a crisp, fresh contrast; iceberg or romaine both work well — I prefer romaine for a little extra chew.
- Cheese: 2 cups pre-shredded fiesta blend cheese (Great Value is a time-saver). Shredded cheese melts slightly from room temperature contact and helps bind the layers visually and texturally.
- Black olives: 2.25 ounces sliced black olives (Mario brand), well drained to keep moisture from accumulating between layers.
- Roma tomatoes: 1 cup chopped, drained or patted dry to remove excess juice and prevent watery layers.
- Green onions: 1/2 cup thinly sliced for a fresh, bright finish.
Instructions
Prepare the beans: Add the canned refried beans to a medium mixing bowl with 3 tablespoons of water. Stir vigorously until the mixture is completely smooth and glossy. The small amount of water will loosen any firm spots and make it easy to spread a thin, even layer in the pan. If your beans still feel too stiff, add water 1 teaspoon at a time until you reach a spreadable consistency. Spread the bean layer: Using a silicone or offset spatula, evenly press and spread the refried beans across the bottom of a 9x13-inch baking dish. Aim for a uniform layer approximately 1/2 inch thick; this creates a sturdy base that holds up under subsequent layers without becoming the dominant flavor. Add the guacamole: Spoon the premade guacamole over the bean layer and gently spread with a clean spatula to form a smooth, even layer. Work carefully to maintain the bean layer beneath; small swirls are fine — they add visual appeal when you serve. Season the sour cream: Combine the 2 cups of sour cream with the 1-ounce packet of mild taco seasoning in a small bowl. Whisk until fully incorporated and the mixture is uniform in color. Taste and adjust: if you like more tang, a squeeze of lime helps, but remember that the premade guacamole may already contain citrus. Layer the sour cream: Spread the seasoned sour cream evenly over the guacamole layer, smoothing the top so the salsa will sit neatly on the surface. This layer keeps the guacamole protected from oxidation and adds a creamy tang that contrasts with the beans and salsa. Drain and add salsa: Drain the chunky mild salsa through a mesh strainer to remove excess liquid, then spoon the drained salsa gently on top of the sour cream. Spread it evenly; draining prevents a soggy texture and preserves distinct layers. Top with cheese and lettuce: Sprinkle the pre-shredded fiesta blend cheese evenly over the salsa, followed by a layer of shredded lettuce. The cheese adds richness and helps visually separate the warm, savory components from the fresh toppings. Finish with olives, tomatoes, and onions: Scatter the well-drained sliced black olives across the lettuce, then add the chopped roma tomatoes (pat dry if needed), and finish with the thinly sliced green onions. Cover tightly with plastic wrap and refrigerate for at least 1 hour so the flavors meld and the dip firms slightly for easier scooping.
You Must Know
- This dish is high in protein and fat due to beans, avocado, sour cream, and cheese; it keeps well refrigerated for up to 3 days when tightly covered.
- Freezing is not recommended: the texture of guacamole and sour cream degrades when frozen and thawed.
- Drain watery ingredients thoroughly — salsa and tomatoes are primary culprits for a watery final product.
- Prep time is quick (about 20 minutes active); chill time is one hour to let the layers set and flavors marry.
My favorite part is how the dish travels: once made and chilled in a clear glass 9x13-inch dish, it looks beautiful through the lid and always disappears fast. At potlucks I’ve learned to bring a small tray of extra chips because guests inevitably come back for more, often switching up the chip-to-dip ratio for their personal favorite bite.
Storage Tips
Store the assembled dip covered tightly with plastic wrap or an airtight lid in the refrigerator for up to 3 days. If you plan to assemble early, keep tomatoes and green onions separate and add them within an hour of serving to preserve brightness and prevent excess moisture. For transport, place the dish in a cooler with ice packs; serve cold straight from the cooler or allow it to sit at room temperature for 10 to 15 minutes before serving for optimal scoopability. Discard if left out at room temperature for more than 2 hours.
Ingredient Substitutions
Use mashed cooked black beans or whole black beans mashed with a fork instead of canned refried beans for a fresher flavor and lower sodium content; add 1 teaspoon ground cumin for extra depth. Substitute Greek yogurt for part or all of the sour cream to lighten the dish and increase protein — use full-fat Greek yogurt if you want creamier tang. For a dairy-free version, omit cheese and sour cream and replace with a thick cashew cream and dairy-free shredded cheese; note this will alter the flavor and texture slightly.
Serving Suggestions
Serve with sturdy tortilla chips for scooping; scoop with the chip’s edge parallel to the pan to get all layers in one bite. This is also excellent alongside grilled meats, fajita bowls, or as a topping for baked potatoes or nachos. Garnish individual servings with extra cilantro, pickled jalapeños, or a drizzle of hot sauce for heat lovers. For a party display, set out small bowls of extra chopped tomatoes, cilantro, and lime wedges so guests can customize.
Cultural Background
The layered dip concept draws from Tex-Mex party traditions where layered casseroles and dips evolved as crowd-pleasing, shareable dishes. While the exact origin is hard to pin down, the popularization of the seven-layer dip in the United States took off in the mid-20th century when convenience products like canned refried beans and premade salsas became widely available. The dish reflects a practical blend of Mexican ingredients reinterpreted for communal American entertaining.
Seasonal Adaptations
In summer, swap roma tomatoes for peak-season cherry tomatoes and add diced fresh corn for sweetness and texture. In winter, use jarred roasted red peppers instead of fresh tomatoes for a smoky note and swap romaine for shredded cabbage for sturdier crunch. For themed holidays, change the cheese blend color or add finely chopped red and green bell peppers to echo seasonal palettes.
Meal Prep Tips
To save time, prepare the bean layer and seasoned sour cream up to 24 hours ahead and store in separate airtight containers. Shred lettuce and chop green onions right before serving to keep them crisp. When assembling for meal prep lunches, portion into individual containers with a chip compartment and add fresh tomatoes and green onions on the day of serving to maintain texture and color.
Whether you’re entertaining a crowd or making a simple family snack, this seven-layer assembly consistently delivers balanced flavor, textural contrast, and easy prep. Give it a try and make it your own — small swaps and personal touches will keep it coming back to your table again and again.
Pro Tips
Drain salsa and tomatoes thoroughly to prevent a watery final product.
Thin refried beans with a few tablespoons of water to make spreading easier and smoother.
Assemble the dish at least 1 hour ahead and chill so the layers set and flavors meld.
This nourishing the best 7 layer dip {easy recipe} recipe is sure to be a staple in your kitchen. Enjoy every moist, high protein slice — it is perfect for breakfast or as a wholesome snack any time.
Tags
The Best 7 Layer Dip {Easy Recipe}
This The Best 7 Layer Dip {Easy Recipe} recipe makes perfectly juicy, tender, and flavorful steak every time! Serve with potatoes and a side salad for an unforgettable dinner in under 30 minutes.
Ingredients
Beans and Base
Fresh and Cold Layers
Instructions
Prepare the refried beans
Combine 32 ounces of refried beans with 3 tablespoons of water in a mixing bowl and stir until smooth and spreadable. Adjust water by teaspoon increments if needed.
Spread the bean layer
Use a silicone or offset spatula to evenly spread the beans over the bottom of a 9x13-inch baking dish to create a uniform base about 1/2 inch thick.
Add the guacamole
Spread 1 1/2 cups of premade guacamole evenly over the bean layer, smoothing gently to maintain the bean base.
Season and add sour cream
Whisk 2 cups sour cream with a 1-ounce packet of mild taco seasoning until well incorporated, then spread over the guacamole layer.
Drain and add salsa
Drain 16 ounces of chunky mild salsa through a mesh strainer to remove excess liquid, then spread the drained salsa evenly over the sour cream layer.
Layer cheese and lettuce
Sprinkle 2 cups pre-shredded fiesta blend cheese over the salsa, then add 2 cups shredded lettuce on top of the cheese.
Finish with olives, tomatoes, and onions
Scatter 2.25 ounces sliced black olives, 1 cup chopped roma tomatoes (patted dry), and 1/2 cup thinly sliced green onions over the lettuce. Cover tightly and chill at least 1 hour before serving.
Last Step: Please leave a rating and comment letting us know how you liked this recipe! This helps our business to thrive and continue providing free, high-quality recipes for you.
Nutrition
Did You Make This?
Leave a comment & rating below or tag
@culinya on social media!
Categories:
You might also like...

Fudgy Marshmallow Mud Brownies
Ultra-fudgy brownies crowned with gooey mini marshmallows and a quick-set chocolate icing. Crowd-pleasing, nostalgic, and irresistibly rich in every bite.

Buttery Pecan Pie Bars
Buttery shortbread crust meets a silky brown sugar pecan topping in these easy pecan pie bars. Just 10 minutes of prep for bakery-level bliss.

Silky No-Crack Pumpkin Cheesecake
A flawlessly smooth pumpkin cheesecake with warm spice, buttery graham crust, and no cracks. Finish with caramel and rum-kissed whipped cream.
Did You Make This?
Leave a comment & rating below or tag @culinya on social media!
Rate This Recipe
Share This Recipe
Enjoyed this recipe? Share it with friends and family, and don't forget to leave a review!
Comments (1)
This recipe looks amazing! Can't wait to try it.
Comments are stored locally in your browser. Server comments are displayed alongside your local comments.

Hi, I'm Sophia!
What's Popular

30-Minute Meals!
Join to receive our email series which contains a round-up of some of our quick and easy family favorite recipes.