
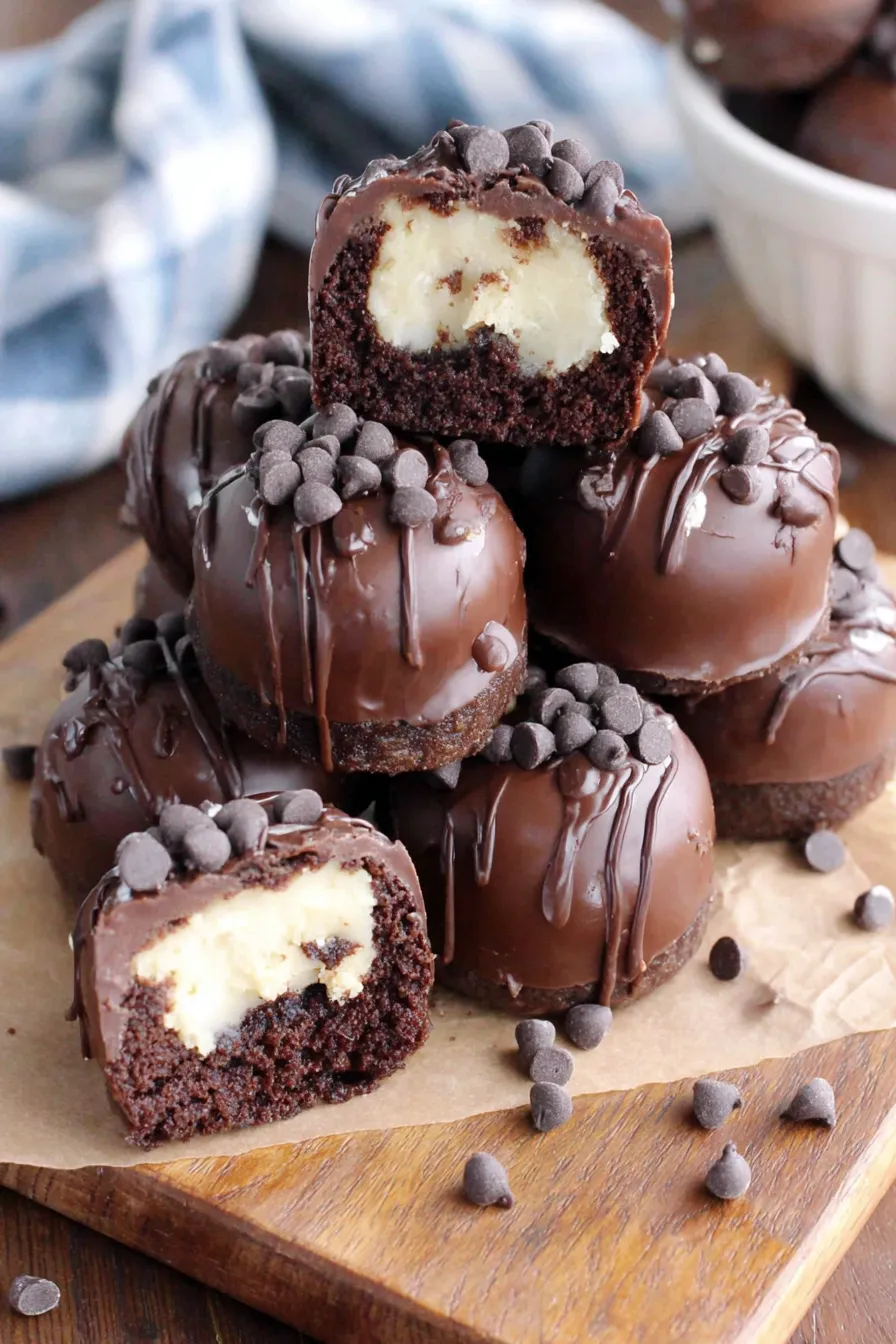
Cookie Dough Brownie Bombs

Decadent brownie squares wrapped around cookie dough, dipped in glossy chocolate and finished with mini chips—an indulgent handheld treat perfect for parties and gifts.
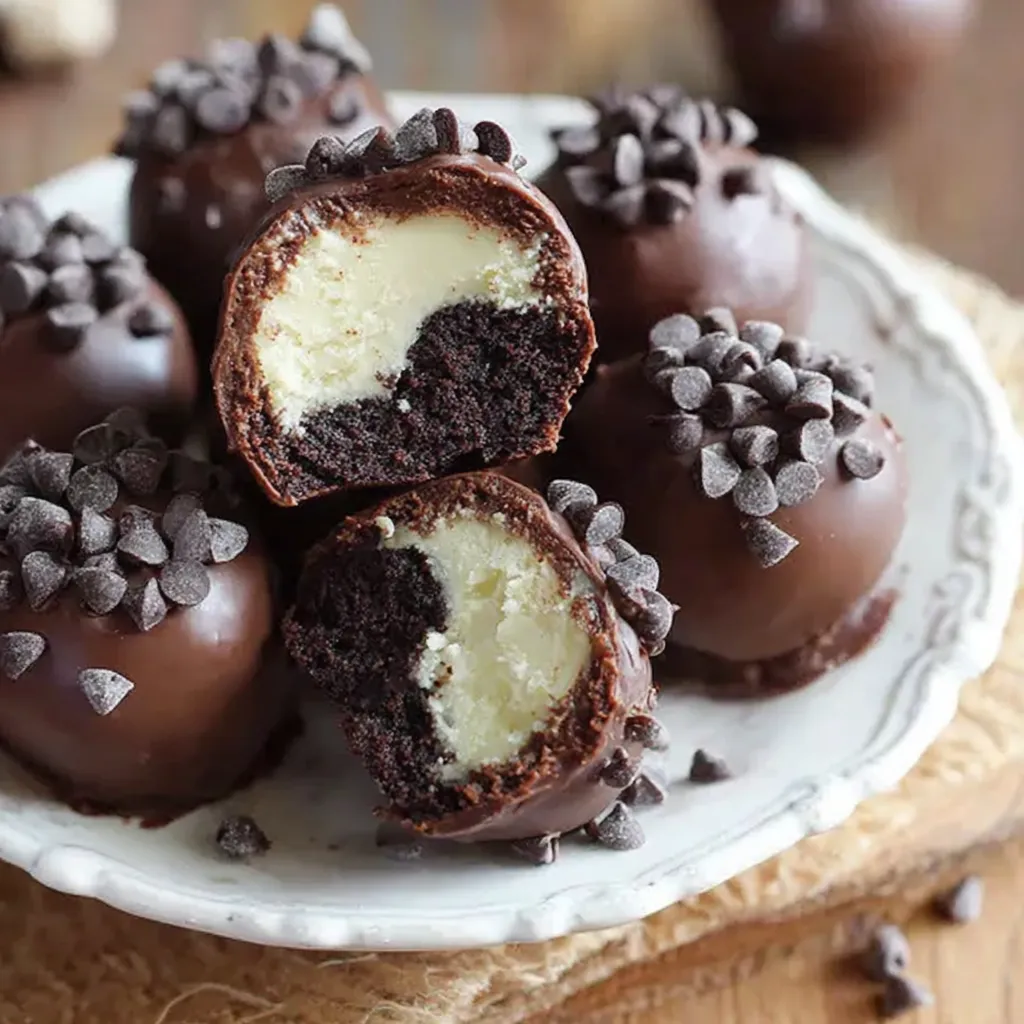
This recipe started as a cheeky weekend experiment to satisfy every chocolate lover in the house at once. I had a pan of leftover brownies and a hankering for warm, raw cookie dough—so I wrapped a flattened brownie square around a ball of cookie dough, chilled it, and dunked the whole thing in melting chocolate. The result? A crackling chocolate shell that gives way to fudgy brownie and soft, sweet cookie dough in the center. These little bombs are rich, nostalgic, and surprisingly simple to assemble.
I discovered this combination during a holiday bake-a-thon when I wanted to offer something elegant but handheld for guests. They disappeared in minutes. The textures are the real star: a glossy candy coating that snaps, a dense brownie middle, and a buttery cookie dough nucleus studded with mini chocolate chips. Each bite hits contrasts—crisp, fudgy, creamy—and the mini chips on top add an extra crunch and visual charm. They’re ideal for potlucks, gifting in boxes, or keeping in the freezer for unexpected dessert emergencies.
Why You'll Love This Recipe
- Make-ahead friendly: portion and freeze the dough and assembled bombs, then finish on demand for fresh-looking treats with minimal last-minute effort.
- Uses pantry staples: common ingredients like butter, brown sugar, flour, and leftover brownies transform into a showstopper without specialty shopping.
- Crowd-pleaser: bite-sized and easily portioned—perfect for parties, holiday platters, or handing out as edible gifts.
- Quick assembly: active hands-on time is modest (about 30–40 minutes); chilling and setting require more time but are passive.
- Versatile coating: use candy melts, tempered chocolate, or ganache depending on how glossy or sturdy you want the shell to be.
- Kid-approved and customizable: swap mix-ins or add mini candies to suit dietary preferences or seasonal themes.
In my kitchen, these became an instant holiday favorite—neighbors received boxes, and my teenagers made them for a bake sale that sold out in under an hour. The easy assembly means anyone can help, which turned a solo project into a fun family activity. I learned that slightly over-freezing the dough makes the wrapping step much neater and reduces stray crumbs when dipping.
Ingredients
- Butter (1/2 cup, softened): Room-temperature unsalted butter gives the cookie dough a creamy mouthfeel. Look for European-style butter for a slightly richer flavor, or use salted and reduce added salt by a pinch.
- Brown sugar (1/2 cup, packed): Light brown sugar adds moisture and caramel notes to the dough. Pack it into the measuring cup for accurate sweetness and chew.
- White sugar (1/4 cup): Balances the brown sugar and helps the dough hold structure when chilled. Granulated sugar works best.
- Milk (2 tbsp) & Vanilla extract (1 tbsp): Liquid and flavoring to bind and flavor the dough—use whole milk for richness or a splash more if your dough feels dry.
- All-purpose flour (1 3/4 cups): The structural base for the dough. For safety, this recipe assumes heat-treated flour if you plan to eat raw dough; you can toast flour in a 350°F oven for 5–7 minutes and cool before use.
- Pinch of salt: Enhances sweetness and balances flavors; adjust to taste if using salted butter.
- Miniature chocolate chips (1 cup + 1/2 cup for topping): Small chips distribute chocolate evenly and look pretty on top. Semi-sweet chips are classic; swap for mini M&Ms for color.
- Brownies (1 full 9x13 pan, baked and cooled): Use your favorite brownie—fudgy works best to maintain structure. Homemade or store-bought both work; cool completely before assembly.
- Chocolate melting candy (12–16 oz): Candy melts or melting wafers (Wilton, Merkens) make a glossy shell and set quickly. High-quality chocolate (Ghirardelli) yields a richer taste but may need tempering for a firm snap.
Instructions
Prepare the cookie dough: In the bowl of a stand mixer fitted with the paddle attachment, beat 1/2 cup softened butter with 1/2 cup packed light brown sugar and 1/4 cup white sugar until light and fluffy, about 2–3 minutes. Add 2 tablespoons milk and 1 tablespoon vanilla and beat to combine. Gradually add 1 3/4 cups all-purpose flour and a pinch of salt until a soft dough forms; fold in 1 cup miniature chocolate chips by hand. Portion and chill: Scoop tablespoon-sized portions of dough (about 1 tablespoon each) onto a parchment-lined baking sheet; you should get roughly 15–20 balls. Freeze for about 30 minutes until firm—this helps keep the center cold during wrapping and dipping. Prepare the brownies: Cut the cooled 9x13 brownie pan into 15 squares. For each square, flatten it between your palms or with a rolling pin to create a thin disc about 1/4 inch thick—work gently so the brownie doesn’t crumble. If your brownies are very fudgy, brief refrigeration makes them easier to handle. Assemble the bombs: Place a frozen cookie dough ball in the center of a flattened brownie disc. Fold the brownie gently around the dough, pinching seams to seal. Roll in your hands to smooth into a neat ball. Place each assembled ball on the prepared sheet seam-side down and return to the freezer for 20 minutes—this firms the whole unit and minimizes crumbs in the coating. Melt the coating: Following package directions for 12–16 ounces of melting candy, melt until smooth. If using microwave, heat in 20–30 second bursts, stirring between bursts. Keep the melted chocolate warm and fluid for easy dipping; add 1 teaspoon vegetable oil only if the candy is too thick to dip. Dip and finish: Using a fork or dipping tool, lower each frozen ball into the melted candy, tapping off excess and smoothing with the fork tines. Place on a silicone mat or parchment paper. Immediately sprinkle with 1/2 cup miniature chocolate chips while the coating is still wet so they adhere. Let set at room temperature or refrigerate briefly to speed setting.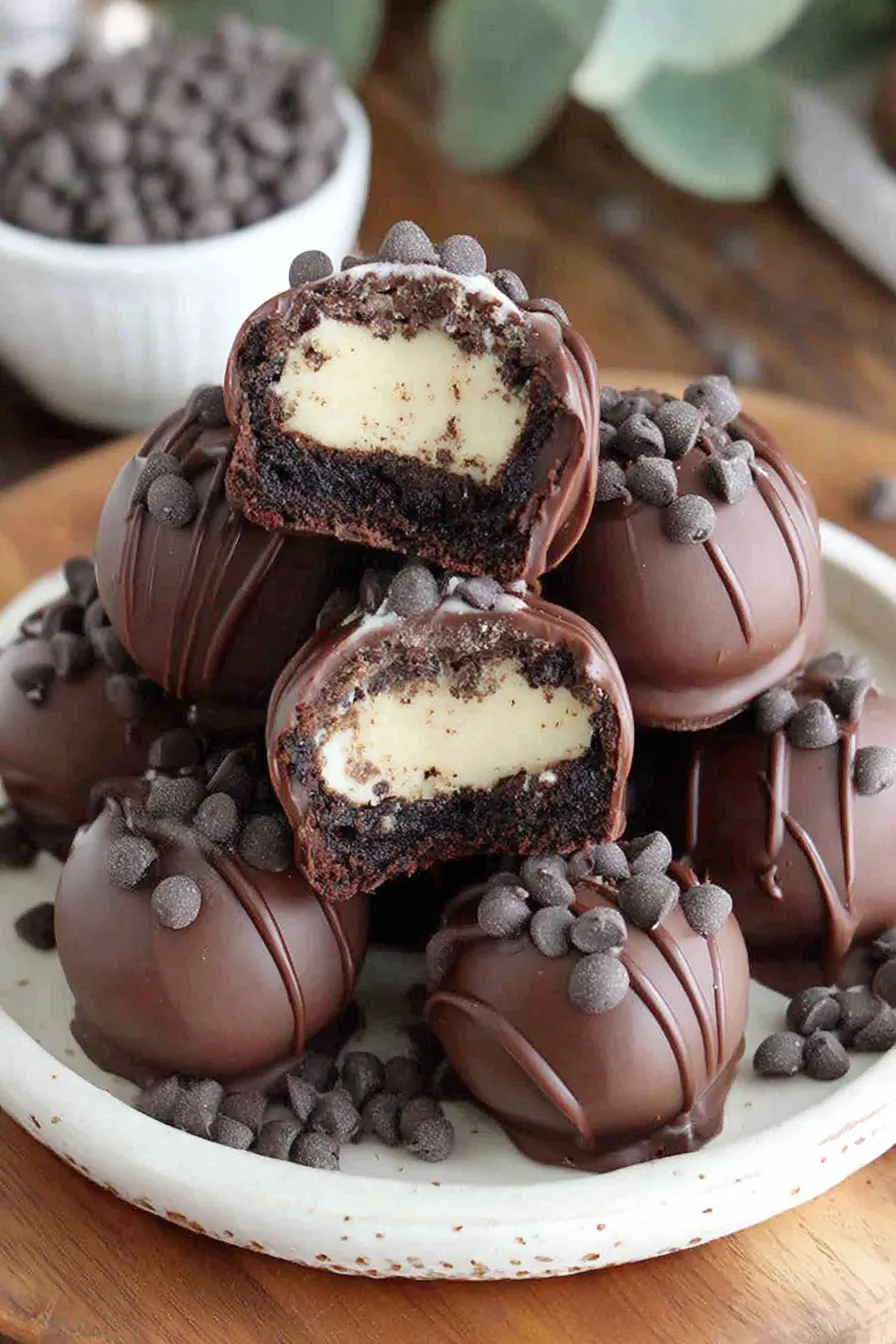
You Must Know
- These keep well in the freezer for up to 3 months if wrapped airtight; thaw 10–15 minutes before serving for the best texture.
- For safe raw consumption, heat-treat the flour beforehand and avoid eggs in the cookie dough; this version has no eggs to reduce risk.
- Use a silicone mat or parchment for easy removal once the coating sets; candy melts will look shiny but can bloom if overheated.
- Each bomb is calorie-dense—serve in small portions as an indulgent treat or pair with coffee to balance richness.
- Chocolate quality matters: cheaper melts set easily, while high-quality chocolate tastes better but may need tempering for a firm snap.
My favorite aspect is the element of surprise—guests expect a brownie, then find a pillowy cookie dough center. On one occasion I made a batch for a family reunion; the youngest and oldest members argued good-naturedly over the last one. The repeatability is great: once you master the dough texture and chilling times, every batch is consistent and gorgeous to present.
Storage Tips
Store finished items in a single layer in an airtight container lined with parchment—avoid stacking until the coating is fully set to prevent sticking. In the refrigerator they keep for 5–7 days; in the freezer they remain excellent for up to 3 months. For freezing, flash-freeze on a tray for an hour before transferring to a freezer bag to maintain shape. To re-crisp the shell, let sit at room temperature 10–20 minutes before serving or warm gently for 5 seconds in the microwave on low to reduce firmness slightly.
Ingredient Substitutions
If you need dairy-free options, substitute vegan butter and use dairy-free chocolate melts; flavor and texture will be slightly different but still delicious. For a gluten-free version, use gluten-free all-purpose flour in the dough and a gluten-free brownie base. Swap miniature chips for chopped nuts or toffee for crunch. If you prefer a sweeter shell, use standard milk chocolate melts; for a more intense chocolate flavor choose dark chocolate and add a pinch of espresso powder to the dough.
Serving Suggestions
Serve on a platter with a small dusting of cocoa or powdered sugar and a scattering of additional mini chips for color. These pair beautifully with strong coffee, a scoop of vanilla ice cream, or a small glass of milk. For parties, arrange them in mini cupcake liners and label with flavor variations. They also make lovely gifts—box in layers separated by parchment and tie with ribbon for a special presentation that travels well when chilled.
Cultural Background
These confections are a playful hybrid of two classic American sweets—cookie dough and brownies—both rooted in 20th-century home baking traditions. The trend of encasing one dessert within another echoes modern dessert mashups and the popularity of bite-sized party treats. The idea of candy-coating desserts borrows from confectionery techniques used in truffles and dipped candies, creating a portable, polished finish reminiscent of chocolate-covered bonbons.
Seasonal Adaptations
Adapt for holidays by swapping mini chips for colored candies (red and green for Christmas, orange for Halloween), or fold in peppermint extract and crushed candy cane for a winter version. In summer, use bright white chocolate and tiny pastel candies for spring celebrations. For Valentine’s Day, add a pinch of cinnamon to the dough and top with pink-hued melts. The shell and toppings are the easiest elements to swap seasonally without changing the core technique.
Meal Prep Tips
Prepare the cookie dough and pre-cut brownie discs in advance and freeze them separately. On the day you plan to serve, assemble the bombs, give a final chill to firm them, and then dip in the coating for a fresh finish. Work in small batches while the coating is fluid to maintain a smooth shell. Use a small scoop for uniform dough balls and label trays so you know which were made with substitutions.
These bites are equal parts nostalgia and clever engineering: they look impressive, travel well, and are forgiving to make. Share them with friends, and don’t be surprised when they ask for the recipe—or for an extra box to take home.
Pro Tips
Chill dough balls until firm to prevent melting or seam separation during assembly and dipping.
Heat melting candy gently in short bursts and stir frequently to avoid overheating and graininess.
Flash-freeze assembled bombs on a tray before transferring to a container to preserve shape.
Use a small cookie scoop for uniform centers—consistency improves coating results.
If the coating thickens, warm gently in 10-second microwave bursts; avoid adding too much oil which dulls flavor.
This nourishing cookie dough brownie bombs recipe is sure to be a staple in your kitchen. Enjoy every moist, high protein slice — it is perfect for breakfast or as a wholesome snack any time.
Tags
Cookie Dough Brownie Bombs
This Cookie Dough Brownie Bombs recipe makes perfectly juicy, tender, and flavorful steak every time! Serve with potatoes and a side salad for an unforgettable dinner in under 30 minutes.
Ingredients
Cookie dough
Brownie layer
Coating & topping
Instructions
Make the cookie dough
Beat softened butter with brown and white sugar until light. Add milk and vanilla, then mix in flour and salt until a cohesive dough forms. Fold in 1 cup miniature chocolate chips by hand.
Portion the dough and pre-freeze
Scoop tablespoon-sized dough balls onto a parchment-lined tray and freeze for about 30 minutes until firm; this prevents sticking and helps with wrapping.
Cut and flatten brownies
Cut the 9x13 brownies into 15 squares. Flatten each square into a thin disc about 1/4 inch thick between parchment or with a rolling pin, chilling if necessary to reduce crumbling.
Wrap brownie around dough
Place a frozen dough ball in the center of a flattened brownie disc, fold the brownie around the dough, seal seams, and roll into a smooth ball. Place seam-side down on a tray and freeze for 20 minutes.
Melt the coating
Melt 12–16 ounces of chocolate melting candy according to package directions, stirring frequently for a smooth, fluid coating. Keep warm and glossy for dipping.
Dip and set
Dip each frozen assembled ball into the melted candy, tap off excess, and place on a silicone mat. Immediately top with 1/2 cup miniature chocolate chips before the coating hardens. Let set at room temperature or refrigerate briefly.
Last Step: Please leave a rating and comment letting us know how you liked this recipe! This helps our business to thrive and continue providing free, high-quality recipes for you.
Nutrition
Did You Make This?
Leave a comment & rating below or tag
@culinya on social media!
Categories:
You might also like...

Fudgy Marshmallow Mud Brownies
Ultra-fudgy brownies crowned with gooey mini marshmallows and a quick-set chocolate icing. Crowd-pleasing, nostalgic, and irresistibly rich in every bite.

Buttery Pecan Pie Bars
Buttery shortbread crust meets a silky brown sugar pecan topping in these easy pecan pie bars. Just 10 minutes of prep for bakery-level bliss.

Silky No-Crack Pumpkin Cheesecake
A flawlessly smooth pumpkin cheesecake with warm spice, buttery graham crust, and no cracks. Finish with caramel and rum-kissed whipped cream.
Did You Make This?
Leave a comment & rating below or tag @culinya on social media!
Rate This Recipe
Share This Recipe
Enjoyed this recipe? Share it with friends and family, and don't forget to leave a review!
Comments (1)
This recipe looks amazing! Can't wait to try it.
Comments are stored locally in your browser. Server comments are displayed alongside your local comments.

Hi, I'm Sophia!
What's Popular

30-Minute Meals!
Join to receive our email series which contains a round-up of some of our quick and easy family favorite recipes.