
Crispy Chicken Taquitos

Golden, crunchy taquitos stuffed with creamy chicken, spinach and cheese—perfect for weeknights, parties, or make-ahead snacks.
This recipe for chicken taquitos has been a favorite in my kitchen ever since a busy weeknight forced me to improvise with a rotisserie bird and pantry staples. I wanted something handheld, satisfying, and fast—something to please both kids and adults. The result is a crunchy, creamy roll filled with tender shredded chicken, melted cheddar, spinach for freshness, and a tangy cream-cheese base that binds everything together. The texture contrast between the silky filling and the crisp shell is what keeps me coming back.
I discovered this combination the first time I mixed softened cream cheese with salsa and sour cream for a dip; the leftover mixture paired so beautifully with shredded chicken that rolling it into tortillas felt like the natural next step. These taquitos are flexible: bake them for a lighter finish or fry briefly for that irresistible deep-fried crisp. They are quick to assemble, travel well for potlucks, and reheat beautifully—qualities that make them an instant classic at home and a favorite at casual gatherings.
Why You'll Love This Recipe
- Ready in roughly 30 minutes from start to finish when you use leftover or rotisserie chicken—perfect for busy evenings.
- Uses pantry staples like cream cheese, salsa, and tortillas, so you rarely need a special grocery run.
- Flexible cooking methods: bake for lighter results or shallow-fry for an extra-crispy exterior in minutes.
- Child-friendly and crowd-pleasing—make a big batch and serve with guacamole, sour cream, and salsa for dipping.
- Easy to customize for heat, cheese type, or added vegetables; the base mixture holds flavors very well.
- Makes excellent make-ahead freezer portions—assemble now and bake or fry later.
I remember serving these at a weekend game night and watching them disappear within ten minutes—family members kept coming back for more and trading little cooking tips. Over time I've learned subtle tricks: warm corn tortillas briefly so they don’t crack, and don’t overfill each roll to ensure a neat, even crisp. These small adjustments make a big difference in the final texture and presentation.
Ingredients
- Cooked shredded chicken (2 cups): I use rotisserie chicken for maximum flavor and ease; remove skin and bones and shred with two forks. Dark meat adds juiciness, white meat keeps it lean.
- Cream cheese (6 ounces), softened: Use full-fat for creaminess and melt stability; letting it sit at room temperature for 20 minutes makes mixing effortless.
- Salsa (1/4 cup): Choose your favorite—mild for kids, medium or hot for more bite. Chunky or smooth both work; a smoky salsa adds depth.
- Sour cream (1/4 cup): Adds tang and loosens the filling; Greek yogurt can be substituted for a tangier, thicker result.
- Shredded cheddar (1 cup): Sharp cheddar melts well and balances the cream cheese. You can mix in Monterey Jack for a creamier melt.
- Baby spinach (1 cup), chopped: Adds color, nutrients and a lightly bitter contrast. Wilted or raw both work—finely chop to distribute evenly.
- Seasonings: 1/4 teaspoon each of ground cumin, garlic powder and chili powder, plus salt and freshly ground black pepper to taste for a warm, balanced profile.
- Tortillas (15-20): Corn or flour, 6-inch size works best. Warm corn tortillas briefly to prevent cracking; flour tortillas are more pliable but slightly heavier.
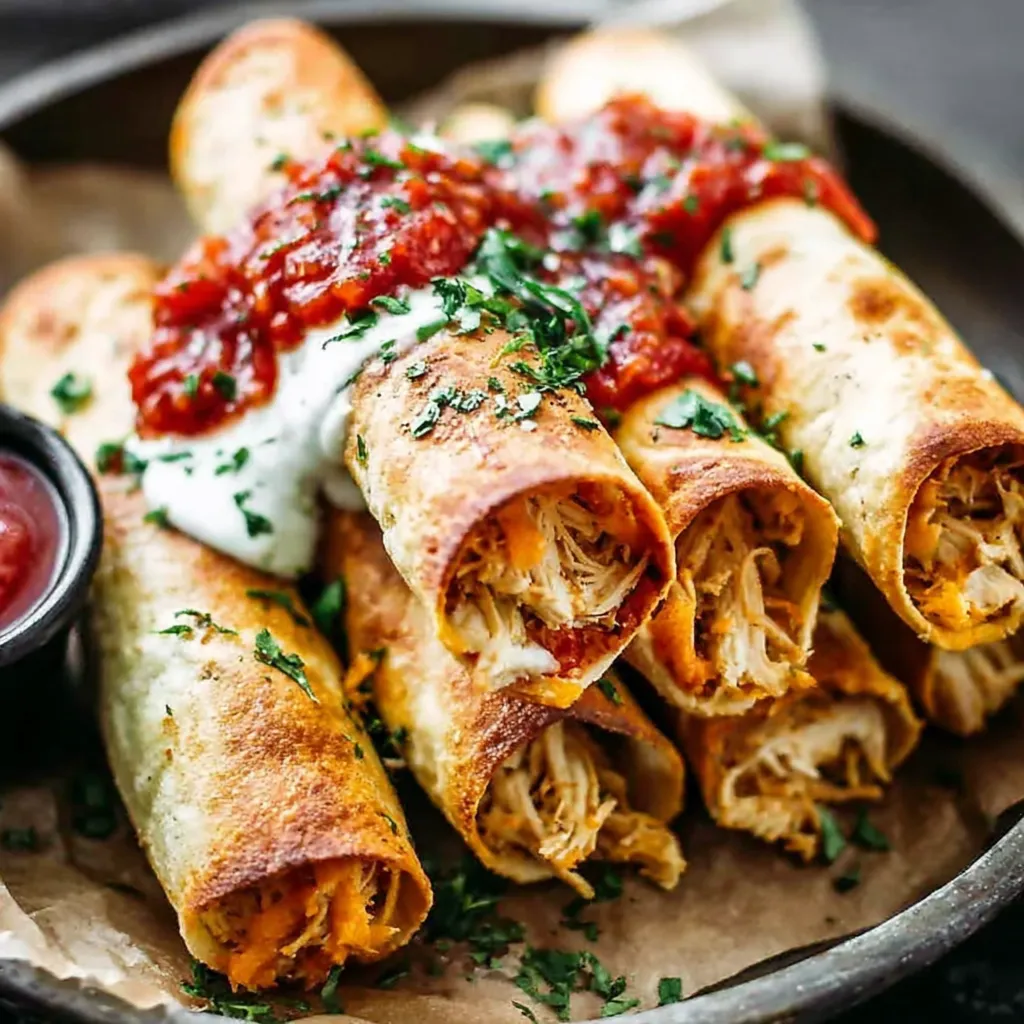
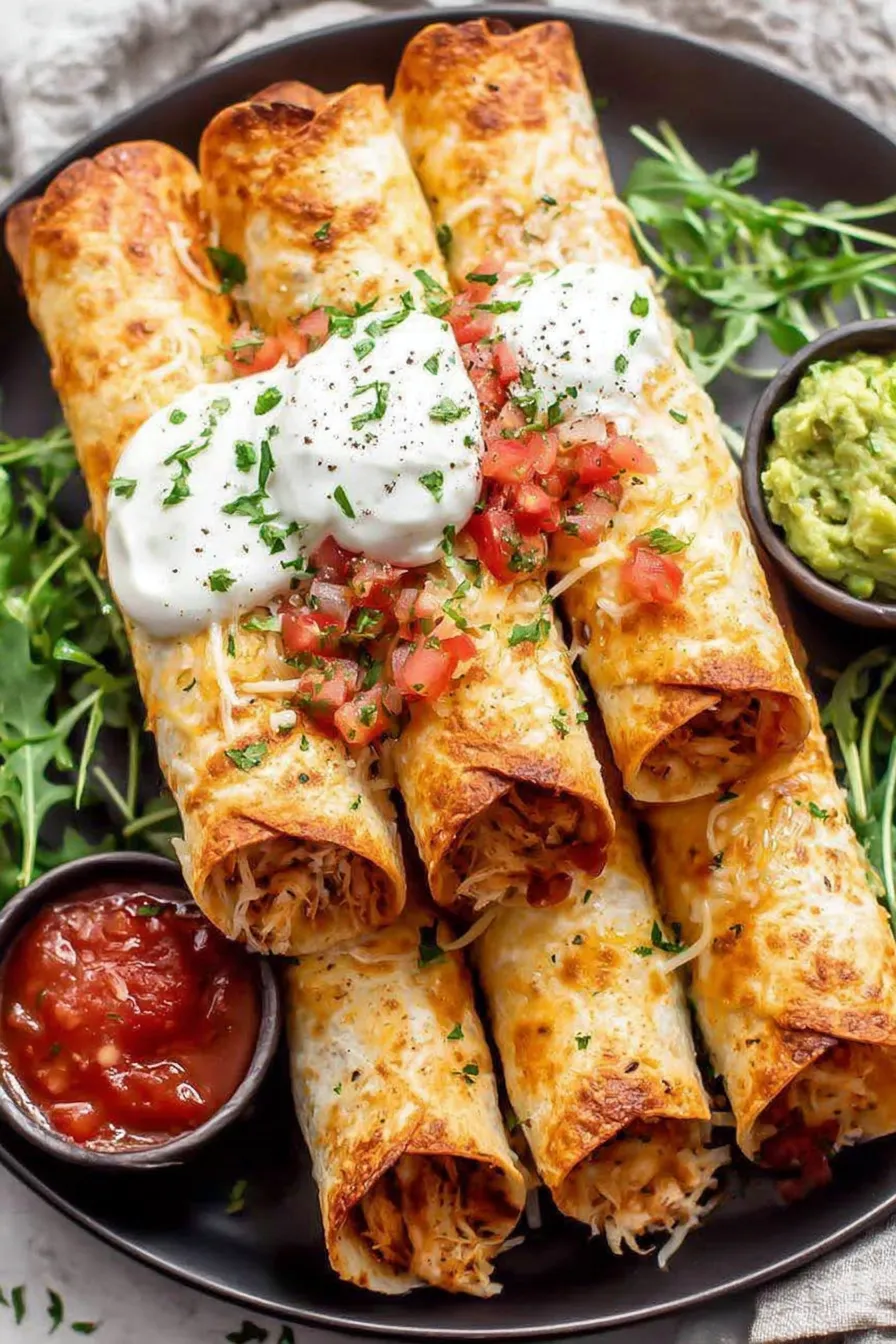
- For serving: Guacamole, extra sour cream, salsa and hot sauce make excellent accompaniments and let guests customize heat and creaminess.
Instructions
Prepare the creamy base: In a medium mixing bowl, beat together the softened cream cheese, salsa and sour cream until smooth and homogeneous. Use a rubber spatula to scrape the sides and ensure no lumps. This base should be spreadable, not runny—adjust with a teaspoon of water or extra salsa if needed. Combine filling ingredients: Add the shredded chicken, shredded cheddar, chopped baby spinach, cumin, garlic powder, chili powder, salt and pepper to the bowl. Toss gently until everything is evenly coated. Taste the filling and adjust seasoning; a small pinch of salt can dramatically brighten the flavors. Warm the tortillas: For corn tortillas, preheat a non-stick griddle or skillet over medium-high heat. Cook each tortilla 15 to 30 seconds per side until soft and pliable—do not char. Stack warm tortillas under foil to keep pliable. For flour tortillas, brief warming in the microwave with a damp paper towel for 15 seconds helps prevent tearing. Assemble the rolls: Spoon a heaping tablespoon or two of filling in a line along each tortilla, leaving about 1/2 inch at the ends. Roll tightly and secure with a toothpick if needed. Keep rolls snug to ensure even crisping; overstuffing leads to leaks while frying or baking. Bake for a lighter finish: Preheat oven to 425°F. Arrange taquitos seam-side down on a rimmed baking sheet lined with parchment. Spray the tops lightly with cooking spray or brush with a teaspoon of oil for golden color. Bake for 15 to 20 minutes until edges are crisp and browned. Flip halfway if necessary for uniform crispiness. Fry for extra crunch: Pour about 1 1/2 inches of vegetable or canola oil into a large skillet and heat over medium-high until shimmering. Test with a small tortilla: it should sizzle immediately. Fry taquitos in small batches, rolling gently so each side turns golden—this typically takes 20 to 40 seconds per side. Drain on paper towels. Serve: Remove toothpicks, transfer taquitos to a platter and serve hot with guacamole, extra salsa and sour cream. A squeeze of lime and a sprinkle of chopped cilantro brighten the plate.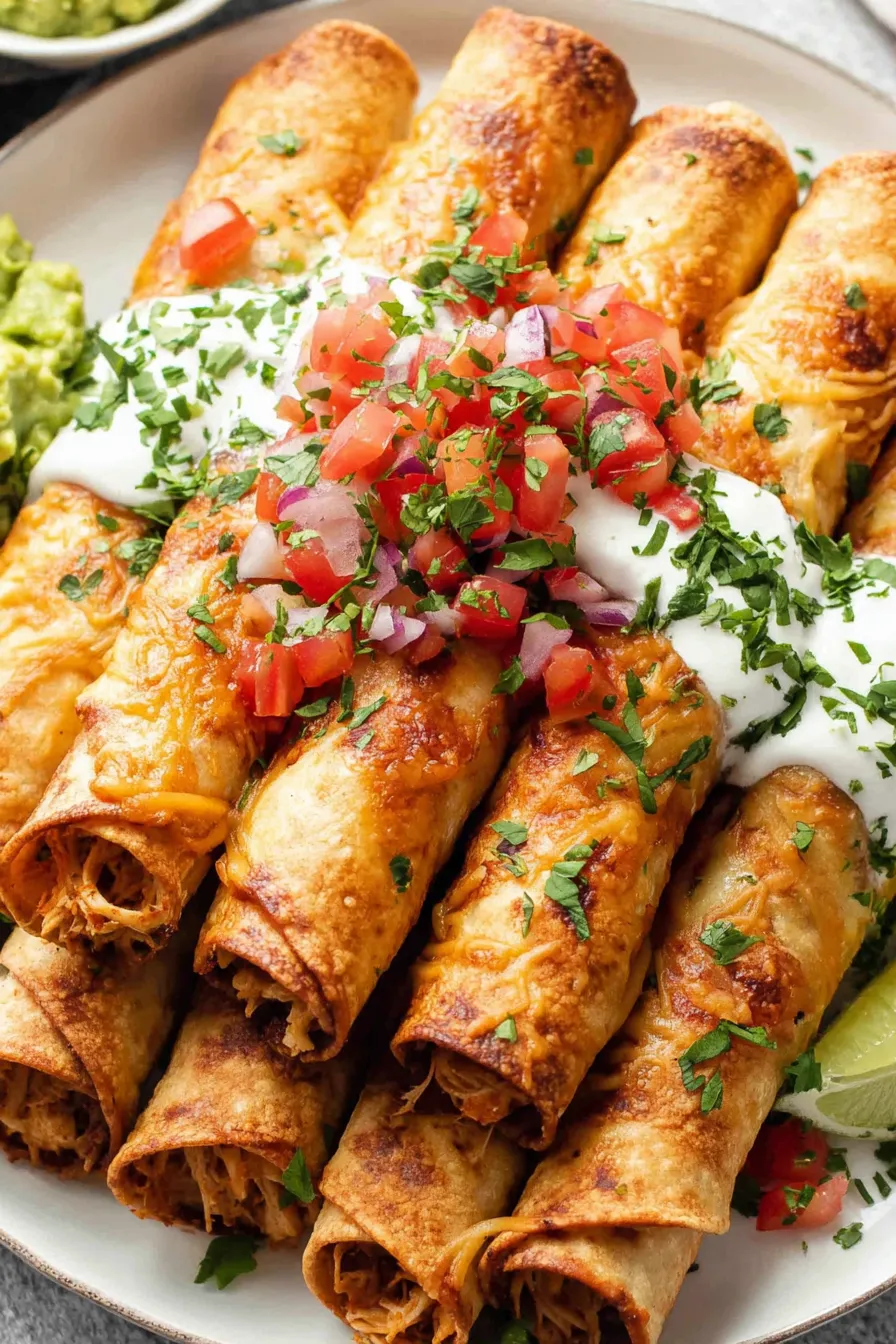
You Must Know
- Taquitos freeze well for up to 3 months; freeze raw on a tray then transfer to a sealed bag to maintain shape and texture.
- Using rotisserie chicken speeds prep and adds depth, but any cooked shredded poultry works, including leftover baked chicken.
- Baked taquitos cut fat and are very crispy if brushed with a bit of oil; quick frying creates a restaurant-style crunch.
- Spinach is optional but recommended for color and balance; you can swap with finely diced bell pepper or roasted corn.
- For gluten-free, stick with certified corn tortillas and check salsa labels for additives.
My favorite aspect of this dish is its versatility. Once I've made the filling, I can decide on the fly whether guests want a lighter oven-baked version or an indulgent fried batch. Family members argue over who gets the first plate—the kids invariably choose the crispiest, and the adults keep reaching for seconds because the blend of tangy cream cheese and smoky salsa pairs so well with warm chicken. Little tricks like slightly underbaking then finishing under the broiler for 30 seconds give the best crunch without overcooking the filling.
Storage Tips
Store leftovers in an airtight container in the refrigerator for up to 3 days; reheat at 375°F in the oven for 8 to 10 minutes to restore crispness. For freezing, place assembled taquitos seam-side down on a baking sheet and freeze until solid (about 1 hour), then transfer to freezer bags for up to 3 months. Reheat from frozen by baking at 400°F for 18 to 22 minutes, flipping halfway through. Avoid microwaving unless short on time—you’ll lose the crisp exterior. If microwaving, finish in a skillet or toaster oven for a minute to recover texture.
Ingredient Substitutions
If you’re dairy-free, swap cream cheese and sour cream for a dairy-free cream-cheese alternative and coconut yogurt, though melting behavior will differ. For lower fat, use reduced-fat cream cheese and sharp reduced-fat cheddar, but expect slightly less creaminess. Swap spinach with finely chopped kale (massage it first) or sautéed mushrooms for an earthier note. If you prefer more heat, add diced pickled jalapeños or a tablespoon of chipotle in adobo. For added crunch inside, mix in a few tablespoons of canned corn or crisp bell pepper.
Serving Suggestions
Serve taquitos with bowls of guacamole, salsa, sour cream and a zesty crema to let guests customize. A simple chopped salad with lime vinaigrette and pickled red onions complements the richness perfectly. For a party, arrange on a platter with toothpicks removed and small ramekins of salsa and queso for dipping. Garnish with cilantro, lime wedges and a sprinkle of cotija or extra cheddar. Pair with Mexican rice and refried or black beans for a full meal, or offer them alongside a light cucumber-jicama slaw for contrast.
Cultural Background
Taquitos—small rolled tacos—have roots in Mexican street food traditions where tortillas are filled, rolled and fried for portability and crunch. The word “taquito†translates to “small taco.“ Regional variations exist across Mexico and the Southwest U.S., with fillings ranging from shredded beef and chicken to potatoes and cheese. These handhelds became particularly popular in home kitchens because they can be scaled up for guests and adapted to what’s on hand, much like the version here using rotisserie chicken and a creamy binder for ease and crowd appeal.
Seasonal Adaptations
In summer, add fresh corn kernels and diced heirloom tomatoes to the filling for brightness. In fall and winter, swap in roasted butternut squash cubes and sage, or stir in warm spices like smoked paprika and a pinch of cinnamon for depth. Holiday parties call for fancier accompaniments: top with pomegranate seeds and microgreens for color, or serve mini taquitos as hors d'oeuvres with gourmet salsas—pineapple habanero for a sweet-heat contrast works beautifully.
Meal Prep Tips
Make the filling up to 3 days ahead and refrigerate; warm and assemble when ready to cook. For freezer-friendly prep, assemble taquitos and freeze on a tray until firm, then bag them labeled with the date. To reheat from frozen, bake at 400°F until hot and golden. Portion them into meal-sized containers with separate salsa and guacamole containers to avoid sogginess. Use airtight containers with vented lids for quick oven reheating without sacrificing crispness.
These taquitos are an easy, joyful dish to share—simple enough for a weeknight but impressive for company. Make them your own by varying the heat, cheese or filling, and don’t be surprised when they become a requested favorite.
Pro Tips
Warm corn tortillas briefly on a griddle for 15-30 seconds per side so they roll without cracking.
If baking, brush or spray the tops lightly with oil for a golden color rather than relying on high heat alone.
Freeze assembled taquitos on a tray until solid, then store in a freezer bag to keep their shape.
This nourishing crispy chicken taquitos recipe is sure to be a staple in your kitchen. Enjoy every moist, high protein slice — it is perfect for breakfast or as a wholesome snack any time.
Tags
Crispy Chicken Taquitos
This Crispy Chicken Taquitos recipe makes perfectly juicy, tender, and flavorful steak every time! Serve with potatoes and a side salad for an unforgettable dinner in under 30 minutes.
Ingredients
Filling
Wraps & Serving
Instructions
Make the creamy base
Beat cream cheese, salsa and sour cream together until smooth. Use a rubber spatula and ensure the mixture is lump-free and spreadable.
Combine filling
Stir shredded chicken, cheddar, chopped spinach and spices into the creamy base. Taste and adjust salt and heat as needed.
Warm tortillas
Heat corn tortillas 15-30 seconds per side on a hot griddle until pliable. Stack and cover with foil to keep warm and flexible.
Assemble the rolls
Place a line of filling on each tortilla, roll tightly and secure with a toothpick if necessary. Avoid overfilling to prevent leaks.
Bake or fry
For baking: place seam-side down on a sheet, spray lightly with oil and bake at 425°F for 15-20 minutes. For frying: heat 1 1/2 inches oil, fry in batches until golden and drain on paper towels.
Serve
Remove toothpicks and serve hot with guacamole, extra salsa and sour cream. Garnish with cilantro and lime wedges if desired.
Last Step: Please leave a rating and comment letting us know how you liked this recipe! This helps our business to thrive and continue providing free, high-quality recipes for you.
Nutrition
Did You Make This?
Leave a comment & rating below or tag
@culinya on social media!
Categories:
You might also like...

Fudgy Marshmallow Mud Brownies
Ultra-fudgy brownies crowned with gooey mini marshmallows and a quick-set chocolate icing. Crowd-pleasing, nostalgic, and irresistibly rich in every bite.

Buttery Pecan Pie Bars
Buttery shortbread crust meets a silky brown sugar pecan topping in these easy pecan pie bars. Just 10 minutes of prep for bakery-level bliss.

Silky No-Crack Pumpkin Cheesecake
A flawlessly smooth pumpkin cheesecake with warm spice, buttery graham crust, and no cracks. Finish with caramel and rum-kissed whipped cream.
Did You Make This?
Leave a comment & rating below or tag @culinya on social media!
Rate This Recipe
Share This Recipe
Enjoyed this recipe? Share it with friends and family, and don't forget to leave a review!
Comments (1)
This recipe looks amazing! Can't wait to try it.
Comments are stored locally in your browser. Server comments are displayed alongside your local comments.

Hi, I'm Sophia!
What's Popular

30-Minute Meals!
Join to receive our email series which contains a round-up of some of our quick and easy family favorite recipes.