
>>

Soft, crinkly green cookies with a sweet heart center—perfect for holiday baking and sharing. A playful twist on a classic sugar cookie that’s easy to make and delightful to gift.

This batch of Grinch Cookies started one December when I wanted a whimsical treat for our holiday cookie exchange. I was aiming for something that tasted like a tender shortbread but looked festive and playful — a vivid green exterior and a tiny red heart pressed into the center. The first time I made them, the dough came together in minutes, the baking step produced those signature crinkled tops, and the little red hearts immediately made everyone smile. They’ve become a holiday staple at our house: easy to portion, forgiving in the oven, and beloved by kids and adults alike.
The texture sits somewhere between a melt-in-your-mouth butter cookie and a sugar cookie: delicate, slightly crumbly, and perfectly sweet without being cloying. The cornstarch and powdered sugar coating creates a soft, powdery exterior that highlights the green color and gives a pretty contrast to the red heart garnish. These cookies are ideal for gifting because they pack and stack nicely, and they travel well. I usually double the batch when friends are coming over because they disappear fast — a sure sign that they’re a winner.
From the first time I brought these to a cookie swap, I learned that small presentation details matter: pressing the heart in while the cookies are still warm ensures it stays snug and glossy. Family members told me they loved the buttery crumb and the light crackle on top — little textural contrasts make these memorable.
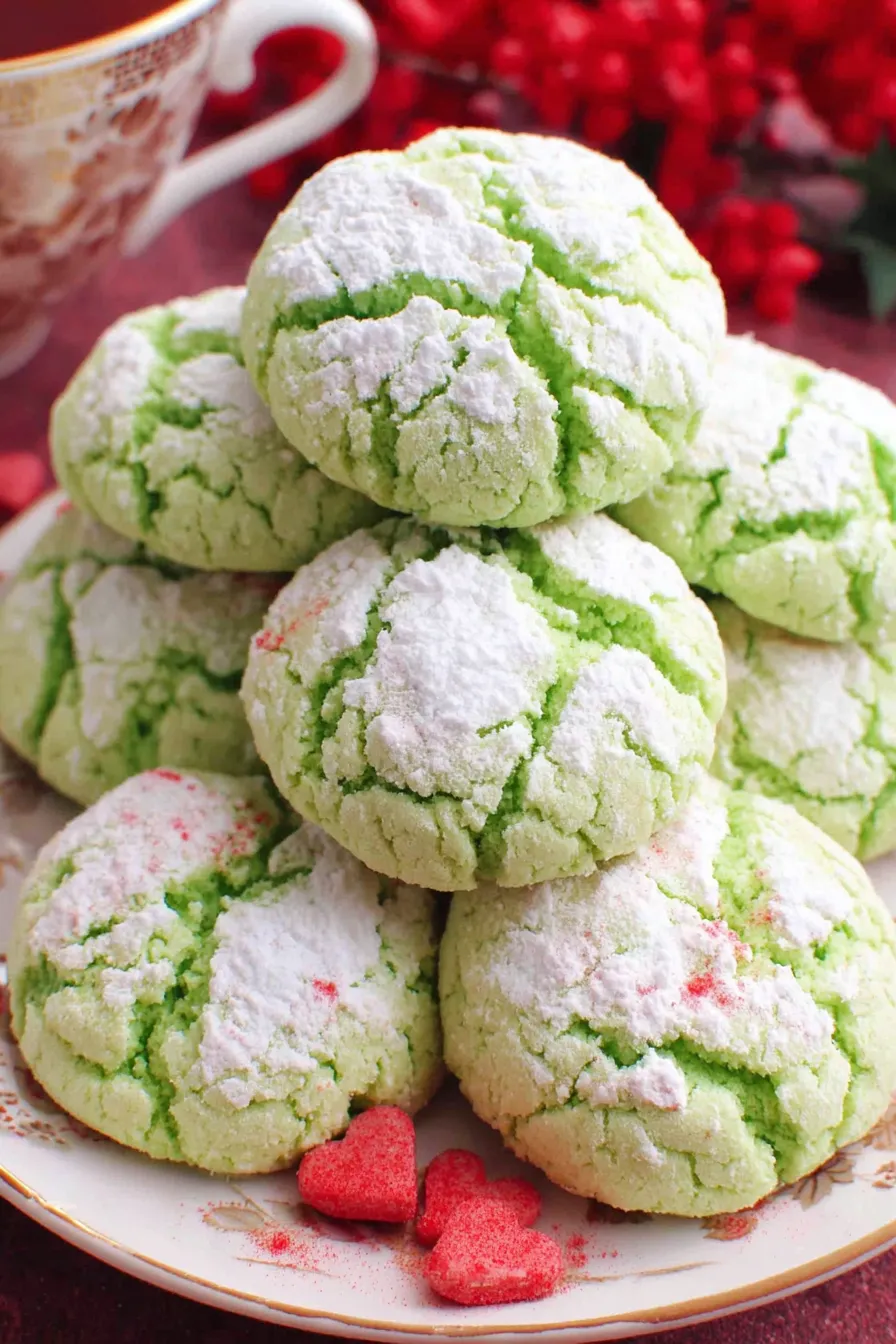
My favorite thing about these treats is how they bring out smiles — the small red heart on top turns a simple cookie into a tiny gift. Over the years I’ve learned to watch the bottoms for doneness rather than the top; a lightly golden underside means the interior is cooked while the top remains tender.

Store cooled cookies in an airtight container at room temperature for up to one week. Layer with parchment or wax paper to prevent sticking and preserve the powdered finish. For longer storage, place in the freezer in a single layer until firm, then move to a freezer-safe container with parchment between layers; label with the date. To re-crisp slightly, warm in a 300°F oven for 3–4 minutes, watching carefully so the candy hearts don’t melt.
If you need to adjust the recipe, swap half the butter (1/4 cup) with neutral vegetable shortening to slightly reduce spreading and create a firmer edge. For dairy-free versions, use a vegan butter stick measured cup-for-cup and choose a vegan egg replacer (such as 2 tablespoons ground flaxseed mixed with 6 tablespoons water for two eggs) — texture will be a touch denser. To make gluten-free, use a 1:1 gluten-free flour blend designed for baking and add 1/4 teaspoon xanthan gum if your blend lacks it.
Arrange on a festive platter with contrasting colors — sprigs of rosemary look especially pretty next to the green cookies. Serve with hot cocoa, eggnog, or strong coffee. For a playful dessert board, pair with red and white candies, peppermint bark, and small cheeses for adult gatherings; the cookies also make a charming edible gift when stacked in a clear box tied with a ribbon.
These are a playful seasonal creation inspired by classic butter and sugar cookie traditions common in North American holiday baking. They borrow the green identity of a beloved holiday character and combine it with time-tested cookie techniques — a nod to the way seasonal baking often blends nostalgia, family rituals, and a dash of whimsy.
Change the color and center candy to suit different seasons: pale green and pastel hearts for spring, lime and yellow accents for summer parties, or swap green for orange and add mini candy corn for a Halloween twist. For Valentine’s Day, make the dough a soft pink and press a chocolate button into each cookie instead of a heart-shaped sprinkle.
Make dough ahead and refrigerate up to 24 hours for firmer cookies with cleaner shapes. If you want to prepare in bulk, roll dough balls and freeze them on a sheet pan until firm, then transfer to a freezer bag; bake from frozen, adding 1–2 minutes to the baking time. This is perfect for preparing several holiday batches without last-minute stress.
These treats are small, bright, and full of charm — they’re one of those simple pleasures that bring people together. Try them once and you’ll find them easy to tweak, great for gifting, and reliably festive. Happy baking and may your kitchen be full of warm memories.
Use a small cookie scoop (about 1 1/2 tablespoons) for uniform size and even baking.
Press the heart candy into the cookie while it’s still hot so it nests in the surface and looks glossy.
If dough feels too soft to roll, chill for 15–20 minutes; slightly firmer dough is easier to portion and coat.
This nourishing grinch cookies recipe is sure to be a staple in your kitchen. Enjoy every moist, high protein slice — it is perfect for breakfast or as a wholesome snack any time.
Yes. Bake directly from frozen but add 1–2 minutes to the baking time. Make sure to press the candy on immediately after baking so it adheres.
Store up to one week at room temperature in an airtight container, or freeze baked cookies for up to 3 months.
This Grinch Cookies recipe makes perfectly juicy, tender, and flavorful steak every time! Serve with potatoes and a side salad for an unforgettable dinner in under 30 minutes.
Preheat oven to 350°F and line two baking sheets with parchment paper. Using parchment prevents excessive browning and makes cleanup simple.
Whisk together 2 1/2 cups all-purpose flour, 2 cups powdered sugar, 1 tablespoon baking powder, and 1/2 teaspoon salt to aerate and evenly distribute the leavening.
Drop 1/2 cup cubed unsalted butter into the flour mixture, add 2 large eggs and 1 tablespoon vanilla, then beat on medium until a thick dough forms; this keeps the crumb tender.
Add 2 drops of green gel food coloring to start and beat until there are no white streaks. Add more color a drop at a time until you reach the desired green.
Whisk 1/2 cup cornstarch with 1/2 cup powdered sugar in a small bowl to create the powdery coating that reduces spread and creates crinkles.
Scoop dough into 1 1/2 tablespoon balls, roll smooth between palms, then roll in the cornstarch-sugar mixture. Place 3 inches apart on baking sheets and slightly flatten.
Bake for 12 minutes or until cookies start to crinkle and bottoms are lightly browned. Immediately press a red heart-shaped sprinkle or candy into the warm center of each cookie, then cool on a wire rack.
Last Step: Please leave a rating and comment letting us know how you liked this recipe! This helps our business to thrive and continue providing free, high-quality recipes for you.
Leave a comment & rating below or tag
@culinya on social media!

Ultra-fudgy brownies crowned with gooey mini marshmallows and a quick-set chocolate icing. Crowd-pleasing, nostalgic, and irresistibly rich in every bite.

Buttery shortbread crust meets a silky brown sugar pecan topping in these easy pecan pie bars. Just 10 minutes of prep for bakery-level bliss.

A flawlessly smooth pumpkin cheesecake with warm spice, buttery graham crust, and no cracks. Finish with caramel and rum-kissed whipped cream.
Leave a comment & rating below or tag @culinya on social media!
Enjoyed this recipe? Share it with friends and family, and don't forget to leave a review!
This recipe looks amazing! Can't wait to try it.
Comments are stored locally in your browser. Server comments are displayed alongside your local comments.

Join to receive our email series which contains a round-up of some of our quick and easy family favorite recipes.
