
Mini Red Velvet Cheesecake Bites

Tender red velvet bases filled with tangy cream cheese for bite-sized indulgence—perfect for parties, holidays, or a sweet everyday treat.
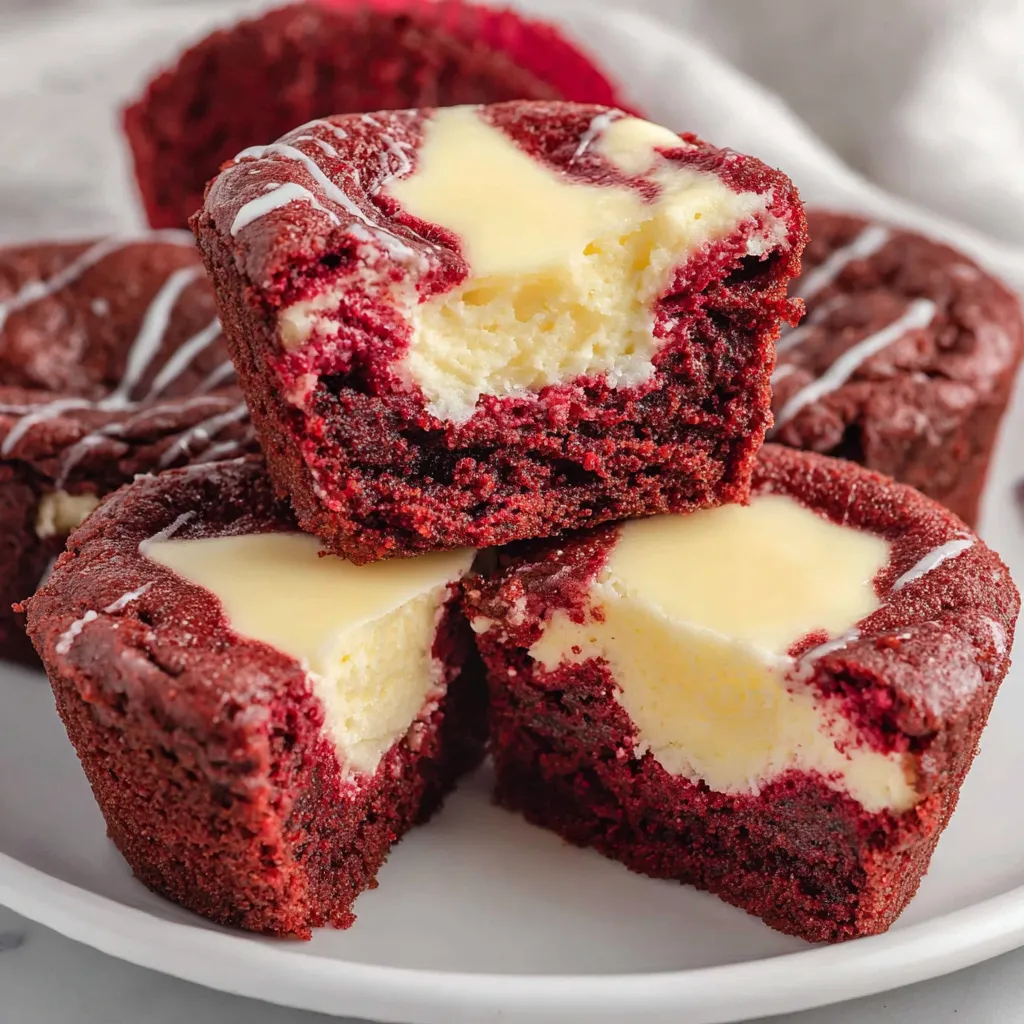
This collection of mini red velvet cheesecake bites has been my go-to when I want a small, elegant dessert that feels special without a lot of fuss. I first developed this version on a rainy afternoon while preparing treats for a neighborhood potluck; I wanted something that combined the nostalgic cocoa-tang of red velvet with the silky richness of a classic cream cheese filling, but in easy-to-share portions. The result: little rounds that are tender, slightly crumbly around the edges, and crowned with a glossy, creamy center. Every time I bring a tray of these, they vanish within minutes.
What I love most is the contrast of textures and flavors—the faint cocoa bite and buttery base paired with the luxuriously smooth cream cheese core. I started with pantry-friendly ingredients and adjusted proportions until the tiny bases remained moist after baking and the filling set without cracking. These are ideal for celebrations, afternoon coffee, or when you want a dessert that looks fancier than the effort required. I use a red gel color for that vivid hue that remains true through baking; Sunny Side Up Bakery’s gel gives consistent results.
Why You'll Love This Recipe
- Made in mini portions for easy sharing, portion control, and quick serving—no slicing required, great for parties.
- Ready in under 40 minutes from start to finish; active prep is short and baking is done in a single quick cycle (8–9 minutes).
- Uses common pantry staples like all-purpose flour, cocoa powder, butter, eggs, and cream cheese; no specialty equipment beyond a mini muffin pan.
- Make-ahead friendly: the bases and filling can be prepared separately and assembled just before baking for stress-free hosting.
- Customizable: easy to tweak for dietary needs or flavor twists—swap the butter or use a different extract to change the profile.
In my experience, guests always comment on how professional these bites look for the minimal effort. My family treats them as party showstoppers—my niece insists on helping pipe the filling and claims the best job goes to whoever sprinkles a tiny pinch of cocoa on top.
Ingredients
- Red Velvet Base: 1 cup all-purpose flour, 1/4 cup unsweetened cocoa powder plus 1 tablespoon unsweetened cocoa powder, 3/4 cup salted sweet cream butter (melted and cooled), 1 1/4 cups granulated sugar, 1 tablespoon red gel food color (Sunny Side Up Bakery recommended), 2 teaspoons pure vanilla extract, 2 large eggs (room temperature and beaten). The flour provides structure while the cocoa adds the signature cocoa note—use a high-quality Dutch-process cocoa if you prefer a deeper flavor. I like salted sweet cream butter for the slight salinity that balances the sweetness; if using unsalted, add a pinch of salt.
- Cheesecake Filling: 8 ounces cream cheese (softened), 1/4 cup granulated sugar, 1 teaspoon pure vanilla extract, 1 large egg yolk. Full-fat cream cheese gives the best mouthfeel; Philadelphia cream cheese is a reliable brand that blends smoothly and sets with the ideal creaminess.
- Notes on ingredients: Room temperature eggs and cream cheese incorporate more easily, preventing lumps and over-beating. Use gel color rather than liquid for an intense, non-watery color that keeps the batter consistency steady.
Instructions
Preheat and prepare pan: Preheat the oven to 350°F. Spray a mini muffin pan with nonstick cooking spray or brush with melted butter; this helps the delicate bases release easily after cooling. Place the pan on a baking sheet for stability when transferring to and from the oven. Dry ingredients: Whisk together 1 cup all-purpose flour, 1/4 cup unsweetened cocoa powder, and 1 tablespoon unsweetened cocoa powder in a small bowl until evenly combined. Sifting is optional but helps prevent lumps and promotes a lighter base texture. Wet ingredients for bases: In a medium bowl, whisk melted and cooled 3/4 cup salted sweet cream butter with 1 1/4 cups granulated sugar until the mixture is glossy. Add 1 tablespoon red gel color, 2 teaspoons vanilla, and the 2 beaten large eggs; whisk until smooth. The butter must be cooled slightly so eggs don't scramble—aim for lukewarm. Combine the base batter: Fold the flour/cocoa mixture into the wet ingredients until just incorporated. Overmixing develops gluten and yields tougher bases; stop when no dry streaks remain. The batter should be pourable but thicker than a cake batter—think dense cupcake batter. Make the filling: Beat 8 ounces softened cream cheese on medium-high with a handheld mixer for about 1 minute until smooth. Add 1/4 cup granulated sugar and 1 teaspoon vanilla; mix another 1 to 1 1/2 minutes. Add 1 large egg yolk and mix just until uniform—avoid overbeating to prevent excess air, which can cause the centers to crack or collapse. Assemble: Drop about 1 tablespoon of red velvet batter into each prepared mini muffin cup. Transfer the cheesecake filling to a disposable piping bag or a quart-size zip-top bag and snip the end. Pipe roughly 2 teaspoons of filling into the center of each base, leaving a small margin around the edges to allow the base to rise slightly without overflowing. Bake and cool: Bake at 350°F for 8 to 9 minutes—watch closely toward the end: the edges should be set while the center remains slightly jiggly. Remove from oven and allow the bites to cool in the pan for 20 to 30 minutes before removing to a wire rack to cool completely. Chilling briefly helps the filling set further.
You Must Know
- These bites keep well in the refrigerator for up to 4 days when stored in an airtight container; they also freeze well for up to 3 months—thaw overnight in the refrigerator.
- High in dairy and eggs, they are not suitable for those with dairy or egg allergies; they contain gluten from all-purpose flour.
- Bake time is short—8–9 minutes—so avoid overbaking which will dry out the bases and stiffen the center.
- Use gel color for best hue and avoid adding extra liquid which can upset the batter balance.
My favorite aspect is how these bites bridge casual and formal: they look like a bakery treat but are so simple to make. Family members often argue over who gets the last one, and I've started doubling the batch for gatherings because they always disappear.
Storage Tips
Store cooled bites in a single layer or with parchment between layers inside an airtight container in the refrigerator for up to 4 days. For longer storage, freeze on a baking sheet until solid, then transfer to a zip-top bag or freezer container for up to 3 months. To reheat, thaw in the refrigerator overnight and bring to room temperature for 30 minutes before serving; if you prefer them slightly warm, heat individual bites for 5–8 seconds in the microwave—watch closely to prevent the filling from melting.
Ingredient Substitutions
For a lighter base, substitute 1/4 cup of the flour with almond flour, keeping total dry volume the same; expect a slightly softer texture and nuttier flavor. If you need to avoid cow’s milk, use a dairy-free cream cheese alternative and a plant-based butter; be mindful that texture and setting will differ. To reduce sugar, replace part of the sugar in the base with a granulated erythritol cup-for-cup, but note the crust’s browning will be less pronounced.
Serving Suggestions
Serve these on a tiered tray for elegant presentation. Garnish with a tiny dusting of cocoa powder, a mini chocolate shard, or a sprinkle of crushed freeze-dried raspberries for a pop of color. They pair beautifully with coffee, espresso, or a glass of sparkling wine. For a holiday twist, top with a small mint leaf or cranberry for festive contrast.
Cultural Background
Red velvet’s origins trace back to early 20th-century America where cocoa, vinegar, and buttermilk produced a cake with a distinctive tender crumb and subtle cocoa flavor. The red color became associated with romance and celebration. Combining red velvet with cream cheese filling leans on classic pairing traditions—tangy cheese balances sweet cake—creating a hybrid that has become popular at weddings and holiday gatherings.
Seasonal Adaptations
In winter, add a pinch of warm spices (1/8 teaspoon cinnamon and 1/16 teaspoon nutmeg) to the base for a festive aroma. In summer, serve chilled with a dollop of lightly whipped cream and fresh berries. For Valentine’s Day, pipe the filling into heart-shaped mini molds or top each with a tiny heart candy.
Meal Prep Tips
Prepare the base batter and cheesecake filling separately and refrigerate them in covered containers for up to 24 hours. When ready to bake, spoon the base and pipe the filling directly into the pan—this saves time before guests arrive. Use a piping bag with a small round tip for consistent filling placement and fewer cleanup chores.
These mini red velvet cheesecake bites are a compact way to enjoy a comforting classic with minimal fuss. They invite experimentation and sharing—try different toppings and watch how a small change can transform the experience. I hope they become a favorite in your kitchen as they are in mine.
Pro Tips
Bring cream cheese and eggs to room temperature for smoother filling with no lumps.
Use gel food color to avoid thinning the batter and to achieve a vivid red hue.
Do not overmix the base batter; stop when no dry streaks remain to keep bases tender.
This nourishing mini red velvet cheesecake bites recipe is sure to be a staple in your kitchen. Enjoy every moist, high protein slice — it is perfect for breakfast or as a wholesome snack any time.
Tags
Mini Red Velvet Cheesecake Bites
This Mini Red Velvet Cheesecake Bites recipe makes perfectly juicy, tender, and flavorful steak every time! Serve with potatoes and a side salad for an unforgettable dinner in under 30 minutes.
Ingredients
Red Velvet Base
Cheesecake Filling
Instructions
Preheat and prepare pan
Preheat oven to 350°F and spray a mini muffin pan with nonstick spray or brush with butter. Place pan on a baking sheet for stability.
Combine dry ingredients
Whisk together the flour and unsweetened cocoa powder until evenly combined; sift if desired for a lighter texture.
Make wet base mixture
Whisk melted and cooled butter with sugar until glossy, then add red gel, vanilla, and beaten eggs. Whisk until smooth but not aerated.
Fold batter
Fold dry ingredients into the wet mixture until just combined; avoid overmixing to keep the bases tender.
Prepare filling
Beat softened cream cheese until smooth, add sugar and vanilla, then mix in the egg yolk until just combined with no yellow streaks.
Assemble cups
Drop 1 tablespoon of base batter into each muffin cup, then pipe about 2 teaspoons of cheesecake filling into the center of each base.
Bake and cool
Bake at 350°F for 8–9 minutes until edges are set and centers slightly jiggly. Cool in pan 20–30 minutes, then transfer to a wire rack to cool completely.
Last Step: Please leave a rating and comment letting us know how you liked this recipe! This helps our business to thrive and continue providing free, high-quality recipes for you.
Nutrition
Did You Make This?
Leave a comment & rating below or tag
@culinya on social media!
Categories:
You might also like...

Fudgy Marshmallow Mud Brownies
Ultra-fudgy brownies crowned with gooey mini marshmallows and a quick-set chocolate icing. Crowd-pleasing, nostalgic, and irresistibly rich in every bite.

Buttery Pecan Pie Bars
Buttery shortbread crust meets a silky brown sugar pecan topping in these easy pecan pie bars. Just 10 minutes of prep for bakery-level bliss.

Silky No-Crack Pumpkin Cheesecake
A flawlessly smooth pumpkin cheesecake with warm spice, buttery graham crust, and no cracks. Finish with caramel and rum-kissed whipped cream.
Did You Make This?
Leave a comment & rating below or tag @culinya on social media!
Rate This Recipe
Share This Recipe
Enjoyed this recipe? Share it with friends and family, and don't forget to leave a review!
Comments (1)
This recipe looks amazing! Can't wait to try it.
Comments are stored locally in your browser. Server comments are displayed alongside your local comments.

Hi, I'm Sophia!
What's Popular

30-Minute Meals!
Join to receive our email series which contains a round-up of some of our quick and easy family favorite recipes.